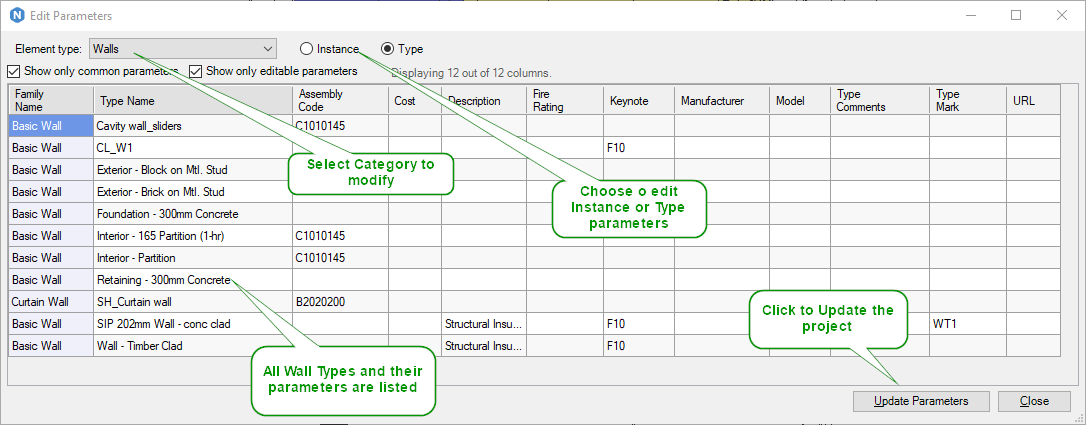
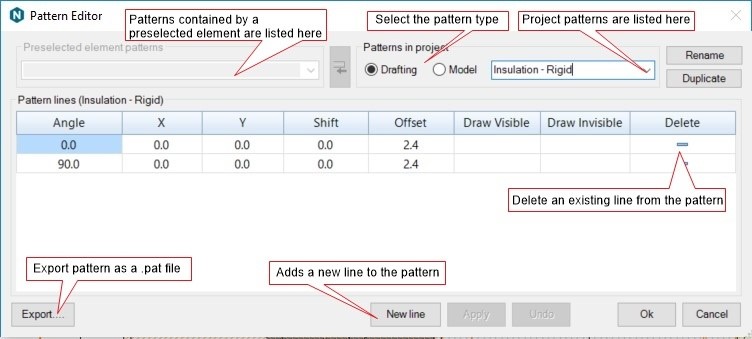
With Pattern Editor you can directly edit the settings for any Revit hatch pattern. Simple patterns (equal distance and same angle on all lines) can be edited directly in Revit itself, but more complex patterns require the user to write a custom hatch pattern definition file (a .pat-file) and then import the definition file to a Custom Pattern instead of a Simple Pattern.
Writing this type of definition file is quite a challenge, since the format is based on the same kind of hatch patterns used in AutoCAD. With Pattern Editor you can edit existing patterns and create new patterns without using a pattern definition file. You can also preview the changes as well as duplicate, rename and apply the pattern to materials in the Revit project.
How a pattern definition works
Defining a pattern can be quite a complicated process, but the theory is fairly simple.
A pattern consists of lines which repeats/offsets themselves with a certain distance. They have an angle, a starting coordinate, sometimes a shift but always a distance where they will repeat.
A line can be continuous, or it can be dashed. A dashed line is simply two distances where one is visible (the pen is down) and one is invisible (the pen is up), and then it repeats.
In Revit, a line can also be dashed using several combinations of visible and invisible, but the first version of Naviate Pattern Editor (2018.1.8/2019.1.4) only supports one combination.
If you want to know more, there's an blog post going into more details on pattern definitions here.
Defining a simple pattern
- Start by drawing your pattern with lines in Revit, or AutoCAD if you prefer
- Find the pattern and how it’s repeating, find the lines which makes up the pattern and if they are not continuous, how they are doing pen down (visible line) and pen up (invisible line)
- For simplicity’s sake, don’t worry too much about the possibility to also use the Shift functionality.
Step 1
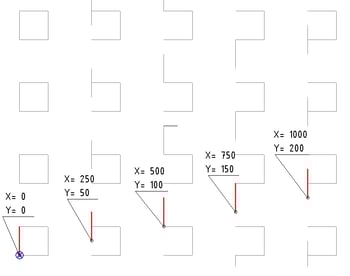
A good idea can be to draw/position your pattern close to the Revit origin. That way you can measure the coordinates easily using Spot Coordinate.
Step 2
The first line (green) in this pattern is:
- Angle: 90 (vertical)
- X/Y: 0,0 (starting point)
- Offset: 250 (it’s a dashed line drawn visible 100 and then invisible 150 before it repeats)
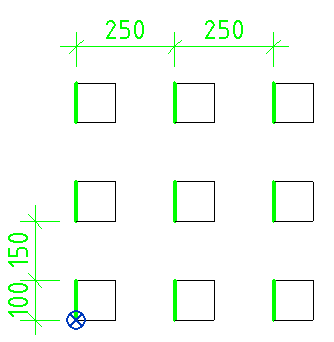
Step 3
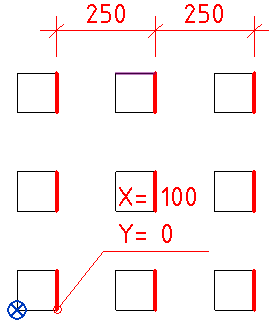
The next line (red) is also vertical so:
- Angle is 90
- X/Y: 100, 0 (using Spot Coordinate)
- Offset: 250 and is dashed the same way
Tip: In most simple patterns, the repeat/offset distance is usually the same distance in all perpendicular lines, otherwise the pattern will start to wander over the filled region or material hatch.
Step 4
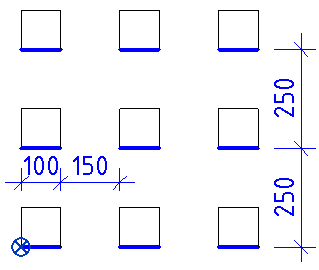
The horizontal lines (blue), are:
- Angle 0
- X/Y: 0,0
- Offset: 250 (dashed with 100 visible and 150 not visible)
The other horizontal line (not coloured) follows the same procedure. You are now ready to enter the values into Naviate Pattern Editor.
Step 5
- Start the command
- Select a pattern (either Drafting or Model)
- Duplicate or start changing an existing pattern
- Enter the values from above
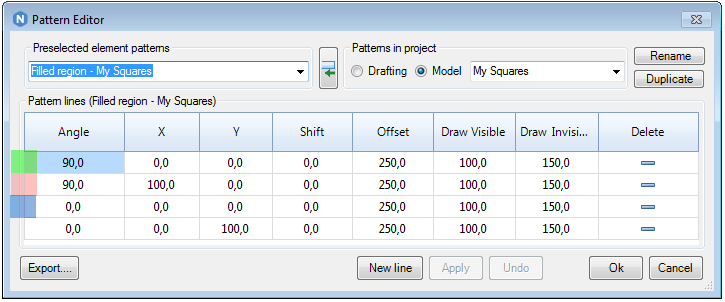
Tip: It might be a good idea before starting the command to create Filled Region with any pattern and then selecting that Filled Region before starting the Naviate Pattern Editor. That way you can preview the pattern at any time by clicking Apply.
Want to test it out? Download a free trial here.
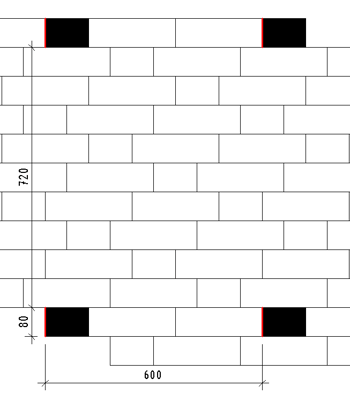
Creating a more complicated pattern
The same principles as above applies to more complicated patterns as well – it’s all a question of finding the repeating pattern, it’s lines and how the lines repeat.
Step 1
In this example – the first red line has:
- Angle: 90
- X/Y: 0,0 (First line in the pattern, start in 0,0)
- Shift: 0 (Shift might be used in this pattern but is tricky)
- Offset: 600
- Draw Visible: 80
- Draw Invisible: 720
Step 2
The next line might be the Magenta one (the order of lines in the definition is not important) – here a good idea could be to draw different measurement types for distance and coordinates (the arrows).
- Angle: 90
- X/Y: 180, 80
- Shift: 0
- Offset: 600
- Draw Visible: 80
- Draw Invisible: 720
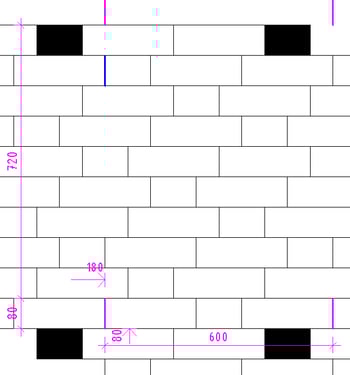
Step 3
Is the blue line part of the magenta line pattern or part of another line? Sometimes it can be tricky to know! Brick patterns such as this are the most common patterns to use the Shift functionality on.
The horizontal lines are easy, but still;
- Angle: 0
- X/Y: 0
- Shift: 0
- Offset: 80
- Draw Visible: 0 (a continuous line)
- Draw Invisible: 0 (a continuous line)
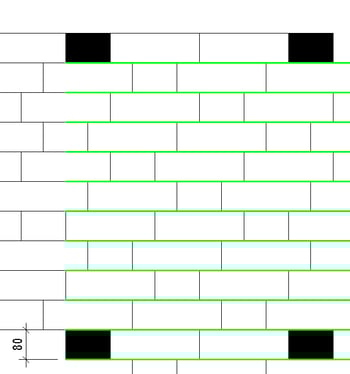
Using the Shift variable
Shift is used to offset the pattern with a certain distance. It’s only used on dashed lines (not continuous ones). It can be used to create patterns with less line definitions but is usually quite tricky to get correct.
The red line in the pattern has Shift: -50, otherwise the pattern is exactly the same as the first one. Shift will cause the dashed pattern to increase by 50 by every offset repetition causing each line segment to stagger.
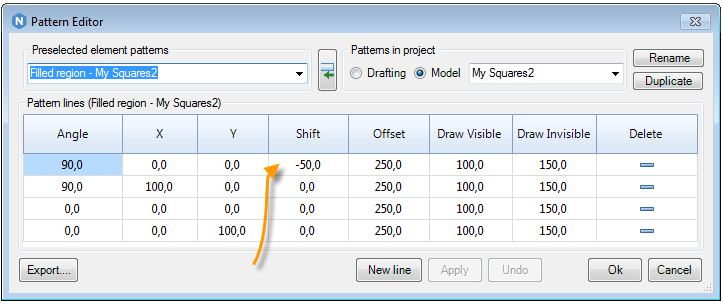
Finding the pattern when you have been using Shift might be difficult but it’s there and using the same method you will be able to find the repetition. It’s a bit like Sudoku.
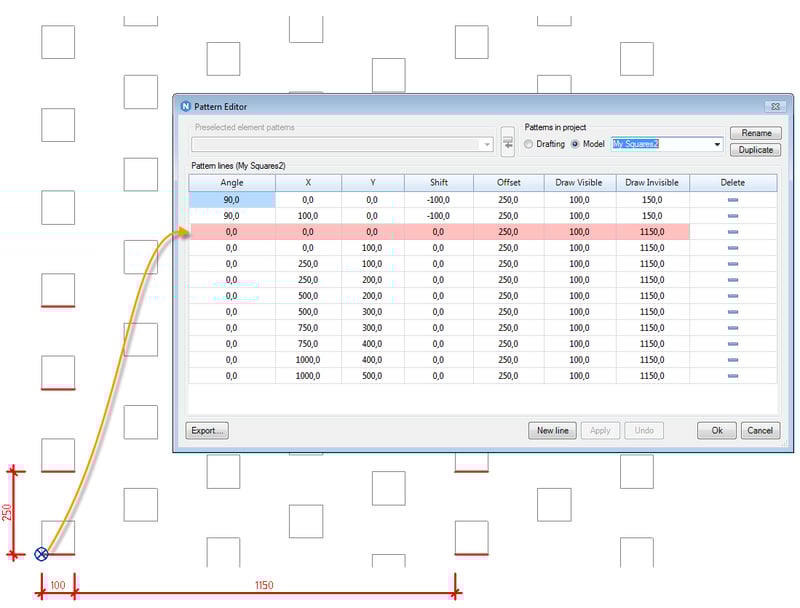
Tip 1: Make sure that you carefully select an existing line when you click New Line, then you will Duplicate that line and the numbers will be same as the first.Tip 2: Rotated patterns are tricky. You must be very careful with both coordinates as well as offset, a very small rounding error might set the whole pattern slightly wrong. Remember that if you are doing a Model Pattern (instead of a Drafting Pattern), Revit lets you rotate the pattern afterwards. It might be easier to create the pattern straight and then rotate.
Want to test it out? Download a free trial here.
Want to know more?
I hope this walk-through was helpful and easy to follow. If you want to try it out, it's a common feature the following Naviate for Revit versions. Try out for free for 30 days!
Want to test it out? Download a free trial here.This is the very first version of Naviate Pattern Editor. We have lots of ideas enabling you to make patterns even easier.
- Also, if you want to know about pattern definitions, this blog post goes into more details.