Create PDFs with correct sheet sizes automatically
During the last couple of years, I have had a question around printing to PDF coming up repeatedly;
"Could I just choose all my sheets in Revit, disregard the sheet sizes and click print and get the correct sheets sizes correct in PDF?"
Finally, I’m happy to inform you that we now have a solution for you. Our recently released Quick Print function now support printing different sheets.
In this blog post I will walk you through how you can use this new feature from Naviate. First, we will have a look at how Quick Print works and what your options are. Then we go into setting options with the "save as" dialogue and the scale to A3 options.
How to use Quick Print
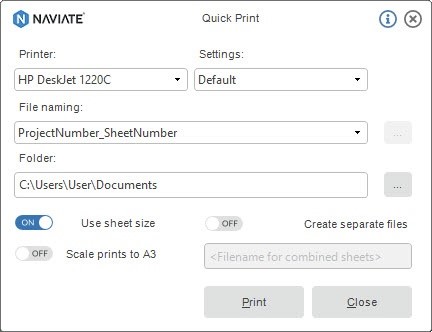
The Quick Print function let you print sheets and views using a printer or to a PDF file.
With Quick Print you can
- Print pre-selected sheets in the project browser using a printer or PDF writer
- Print active view sheet using a printer or PDF writer
- Print active sheet list using a printer or PDF writer
- Determine the size for each sheet so you can print sheets with different size in one operation

The pre-selection workflow
With the following steps, you can have all these Quick Print options at your disposal.
- Pre-select sheets in the Project Browser
- Run Quick Print command under the Publish tool
- Find your printer or PDF writer under the printer name drop down menu
- Choose printer settings
- Set your print file and naming option
- Choose print file save location
- Click the print button to complete the process
"Save as" dialogues
Before you start to batch print, make sure the "save as" dialogue is disabled in your PDF driver. Below we show you how it’s one in three common drivers; PDF Creator, PDF-XChange and Adobe PDF.
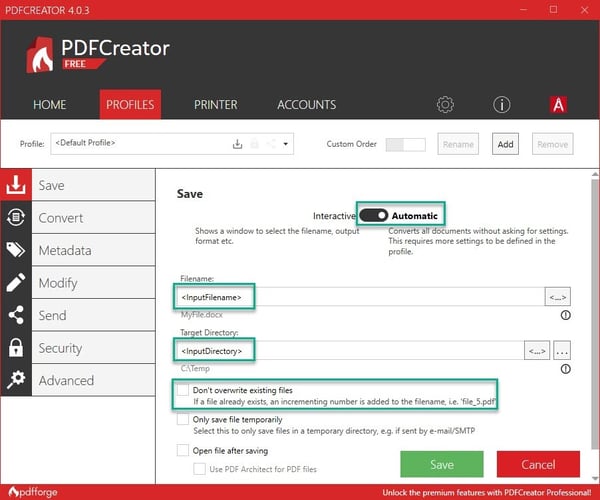
How to disable "save as" using PDF Creator
In Windows, open the PDF creator app.
Under the profiles tab do the following steps:
- Choose automatic on the top button
- Make sure filename is set to <InputFilename>
- Set target directory to <InputDirectory>
- Uncheck "don’t overwrite existing file"
- Save
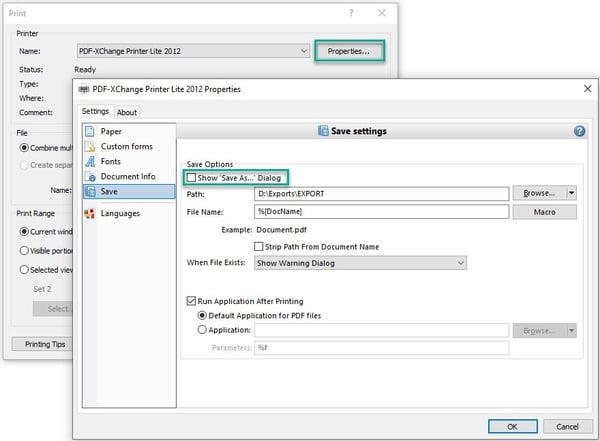
How to disable "save as" using PDF-XChange
- In Revit, go to print and choose the PDF-Xchange driver
- Go to properties and uncheck the show save as dialogue
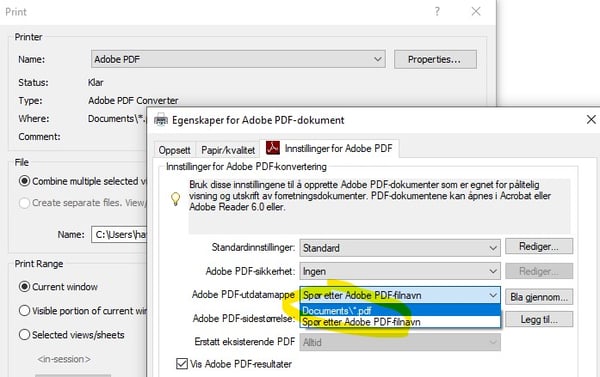
How to disable "save as" using Adobe PDF
- In Revit, go to print and choose the Adobe PDF driver
- Go to properties and choose "Document\*.pdf"
If you can’t find the setting you might have an older version of Adobe Acrobat.
Options for sheet size and scale printing
Below I go into details on how the sheet size options can be used, as well as how you can combine multiple sheets into one PDF. Finally I go through how you can scale to A3 format.
How the use sheet size options
The use sheet size will autodetect the titleblock size. This is done by matching the titleblock with an existing paper size in the selected printer. If a match is not found for a sheet/titleblock a report will display after print. To fix this, add a new paper size in the printer.
The use sheet size will also autodetect:
- Orientation of paper (portrait/landscape)
- Paper placement (margins)
- Zoom is 100% (unless you use the scale to print A3 option)
For printing colour and non-colour sheets simultaneously, check the "NVPrintUseColor" parameter in Sheet Properties for your colour sheets.
For printing raster and vector simultaneously, check the "NVPrintUseRaster" parameter in Sheet Properties for sheets that need Raster processing.
Both the printing colour and non-colour sheets and the raster and vector simultaneously parameters function as an override to the selected Print Setup.
How to add multiple sheets into one PDF
The "use sheet size" option cannot be used when combining multiple sheets into one PDF. This is because Revit does not allow using different print settings (such as paper size) when using "combine multiple sheets into a single file" option.
The "use sheet size" option does not require a compatible print setup selected or any setup really. If the selected print setup is not compatible with the current printer a few default print properties will be set (such as hiding section boxes and crop boundaries etc).
How to use scale prints to A3 format options
The feature will do the following actions:
- Downscale all formats to A3 paper
- Your A4 and A3 sheet print 100% on A4 and/or A3 paper
- Sheets larger that A3 print 50% on A3 paper, including A2
- Your A0 sheets prints 50% on two A3 sheets
Although this will work with PDF drivers the use case is primarily temporary printouts or smaller printers.
Conclusion
In this blog post I've described in detail the three most used PDF drivers; PDF Creator, PDF-XChange and Adobe PDF. You should have similar functionality in other PDF drivers as well. I think this is a big time saver and will remove some of that frustration we have in the market about PDF’s and sheet sizes. If you would like to see it demonstrated live, register for the free webinar May 8th with Quick Print being one of the topics.
Want to know more?
Do you want to test it out yourself? Download a free trial today!
- Naviate Architecture
- Naviate Electrical
- Naviate HVAC & Plumbing
- Naviate Site and Landscaping
- Naviate Structure
Already tried it out. What are your thoughts? Anything you miss or would like to change or add? We would love your input to other topics you would like to know more about. Please leave a comment below, and we will get on it!